What's new
Aloft Forums

Welcome to Aloft Forums. Register a free account today to become a member! Once signed in, you'll be able to participate on this site by adding your own topics and posts, as well as connect with other members through your own private inbox!

"Mini Buzz" Blended Wing Project

Yotaman1985

Very Strong User
Hey guys,

I'm venturing into unknown territory here and starting my first composite bagged wing build. After my mostly successful experience with the Z1 wingtip fins and the desire for a Gizmo style plank after seeing some at Sunset, I have designed a plank with some help from Nate. This is my first time designing a plane and having cores cut so we will see what happens but I am excited to learn along the way.

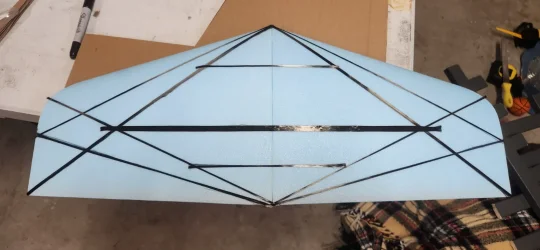
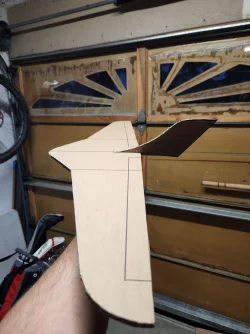
I decided to name it the Mini Buzz and it will be a 30" Blended wing plank with a center vertical fin much like the Gizmo I took inspiration from. The vertical fin will be removable and I havent decided yet if the wing will be one piece or able to split into two. It will be using a PW51 airfoil and will be bagged in carbon fiber.

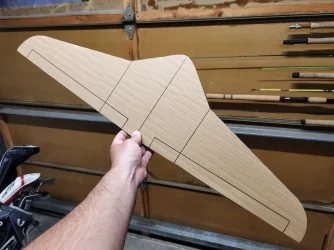
Ill try to post updates on how the build goes and any questions/problems I run into. Pics are of the 3d model I made for measurements and a cardboard cutout so I could hold it for size reference.

Special thanks to Nate for all the help so far!
 

Attachments

  • 20250506_202541.webp
    20250506_202541.webp
    178.5 KB · Views: 38
  • 20250506_202557.webp
    20250506_202557.webp
    136.4 KB · Views: 31
  • 20250506_201518.webp
    20250506_201518.webp
    158.8 KB · Views: 26
  • 20250506_130939.webp
    20250506_130939.webp
    231.4 KB · Views: 29
Ive got some ideas but we'll see if they actually work out... lol
With all of these little wings, it's a good idea to:

1. Make the front sharp, not blunt as a lot of people do - this forces the isobars side to side, compressing the flow and gives you nice pressure on the elevons, or flaps, plus it starts a good spanwise flow regime (which is going to happen anyway) all along the training edge. You got that.

2. The wing tip shape you have chosen, along with the sharp front, helps make the flow lines much less messy over the whole planform. You got that, too.

3. If you feel like it, a pod is not bad, for reason 1. above.

Great start, I'd say.(y)(y)(y)

Doc.
Thanks Doc, apprciate the insight 😊
 
Doing my first wing bag test this weekend. Nate was kind enough to send me a couple extra foam cores he had laying around so I could experiment and practice before trying it with carbon on the Mini Buzz.

Glued the cores together and added carbon tow strips for some strength. Glassed and bagged it with two layers of .85oz glass on each side, then mylar sheets, peel ply and breather cloth. Sucked down alright and now we wait... 🤞 have it weighed down in the wing beds to hopefully keep the right shape and stay flat.

Decided to keep track of weight as well. Starting weight for the cores glued together was 55 grams.
 

Attachments

  • 20250511_130232.webp
    20250511_130232.webp
    170.4 KB · Views: 11
  • 20250511_125912.webp
    20250511_125912.webp
    196.2 KB · Views: 13
  • 20250510_165245.webp
    20250510_165245.webp
    103.9 KB · Views: 12
  • 20250510_155201.webp
    20250510_155201.webp
    129.8 KB · Views: 17
Un-bagged my practice wing tonight and it turned out ok. Have some voids and bubbles, mainly around where the carbon tow is causing the glass to lift a little. Didnt help that I used some old resin and it was on the thick side so it didnt wet out very well. Over all, it should be usable when I clean it up and gave me some good insight in what not to do on the next one 👍
 

Attachments

  • 20250512_173758.webp
    20250512_173758.webp
    177.7 KB · Views: 5
  • 20250512_173810.webp
    20250512_173810.webp
    143.3 KB · Views: 5
Un-bagged my practice wing tonight and it turned out ok. Have some voids and bubbles, mainly around where the carbon tow is causing the glass to lift a little. Didnt help that I used some old resin and it was on the thick side so it didnt wet out very well. Over all, it should be usable when I clean it up and gave me some good insight in what not to do on the next one 👍
What you can do is use Mylar or other wing "shells" to lay the glass/carbon on first. The shells become a soft mould, and you remove them after bagging, but the finish stays. In this case, it's a doddle to get a mirror finish wing with no voids or bubbles. You can even paint it first.

Doc
 
Thanks Doc, I did try mylar for the first time and the surface finish was good. I will probably wet out the glass/carbon on the mylar next time like you suggest and give that a shot. I have new resin coming that should be a lot better than what I tried to use this time too so that should help. The other problem was this wing was right at the limit for what I could fit in the bag so that really didnt help anything.
 
Thanks Doc, I did try mylar for the first time and the surface finish was good. I will probably wet out the glass/carbon on the mylar next time like you suggest and give that a shot. I have new resin coming that should be a lot better than what I tried to use this time too so that should help. The other problem was this wing was right at the limit for what I could fit in the bag so that really didnt help anything.
Getting there - you'll soon be vac-bagging like a champ!

Doc.
 
For interest, the best bagging shell material I found was "Formica: tabletop material.

It's pretty stiff but gives a superb finish with a razor-sharp TE.

It will conform to a vacuum, but it won't conform to go nicely around an LE, so it has to be stopped about a half-inch before that. To address this, I added a couple of strips of softer plastic of the same thickness to the LE. This resulted in a couple of really light lines along the LE area, which can be left as is or polished out.

For super straight wings with razor-sharp TE, (And I mean RAZOR - be Careful!) and a finish as good as the shells, this is the way to go, as it eliminates the foam topography.

Another bonus is that you don't need to weigh the vacuumed assembly down to keep it straight.

Don't forget to wax!

Cheers,

Doc

IMG_4857.webp
 
Yeah its the leading edges i never know what to do. I cheated on my by veneered 72" starfire and chopped the leading edge off and put on balsa leading edge stock and just left that un-veneered
 
Back
Top