Aloft Forums
You are using an out of date browser. It may not display this or other websites correctly.
You should upgrade or use an alternative browser.
You should upgrade or use an alternative browser.
Aeroic Gremlin, build (Aeroic donation to the 2019 ISR)
Konrad
Very Strong User
Mine can easily fly like that. I didn't fly like that as I was still testing my the radio set up (much more extreme flights with a lot of stalls and spins). Stalls are vey benign. Also as I spent a lot of time getting the rudder to give me full throw, I was doing a lot of rudder work. My landing was nothing like that!
Konrad
Very Strong User
I need to thank Mehrdad for throwing out the gremlin on her maiden. I later learned that Mehrdad was so scared with my flying that he couldn't watch. He did say he was impressed with the control authority the Gremlin showed on the landing. That is to say, it wouldn't have been the way he would have landed, but that the Gremlin looked in control.
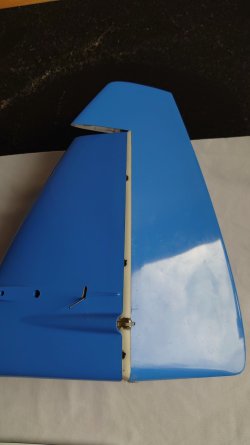
With the way the lift was, I couldn't get above the lip much more than about 6 meters. I turned into the hill and keeping the hard turn tried to come back into the wind. Well. As I was making my turn the sun was setting on the horizon. So for about half the turn I couldn't see the Gremlin as I was staring into the sun. When she came out from the glare of the sun she was on top of the concrete wind mill pad. (Just where I didn't want to be). I pulled up a bit to try to fly over this pad. I made contact with the rear of the fuselage breaking the rudder hinge. From this point on I had no real rudder control. I was able to keep the wings level and flew away from the pad hitting the broken asphalt ground just east of the pad. The scrapes on the bottom of the fuselage show that the ship was almost 90° to the direction of travel. (That's a heck of a side slip landing)!
I have to credit Mehrdad for seeing what really was happening. He pointed out that the rudder hit first (these skid marks are about 15° to the center line of the fuselage). And that this caused the failure of the rudder hinge.
I will add some fairing to extend the fuselage to protect the rudder.
Doc James Hammond
Very Strong User
I need to thank Mehrdad for throwing out the gremlin on her maiden. I later learned that Mehrdad was so scared with my flying that he couldn't watch. He did say he was impressed with the control authority the Gremlin showed on the landing. That is to say, it wouldn't have been the way he would have landed, but that the Gremlin looked in control.
With the way the lift was, I couldn't get above the lip much more than about 6 meters. I turned into the hill and keeping the hard turn tried to come back into the wind. Well. As I was making my turn the sun was setting on the horizon. So for about half the turn I couldn't see the Gremlin as I was staring into the sun. When she came out from the glare of the sun she was on top of the concrete wind mill pad. (Just where I didn't want to be). I pulled up a bit to try to fly over this pad. I made contact with the rear of the fuselage breaking the rudder hinge. From this point on I had no real rudder control. I was able to keep the wings level and flew away from the pad hitting the broken asphalt ground just east of the pad. The scrapes on the bottom of the fuselage show that the ship was almost 90° to the direction of travel. (That's a heck of a side slip landing)!
I have to credit Mehrdad for seeing what really was happening. He pointed out that the rudder hit first (these skid marks are about 15° to the center line of the fuselage). And that this caused the failure of the rudder hinge.
I will add some fairing to extend the fuselage to protect the rudder.
View attachment 5114
View attachment 5115
View attachment 5116
Looks like you got into a bit of a scrape Konrad...(Sorry...ow!)
Doc.
.
Diceman
Moderator
Sorry I missed your flight Konrad. I would have liked to seen it fly. You are a brave man to throw out that plane in the conditions that day with the winds coming very cross to the slope especially for its maiden! I am glad to hear it was not too much damage. Next time I hope you can wait for a really good day so you can let it rip!
Konrad
Very Strong User
Thanks, but I'm not as crazy as to test fly in the conditions we ran the last F3F race. At sundown the lift got a lot better.
The damage to the Gremlin was caused on the bench, as I didn't protect the rudder. I think I would have damaged the rudder on anything other than a zero ground speed landing. Rudders aren't landing grears dispite what one might think looking at DLGs.
Yep, if there is a real problem with the Gremlin it is having to wait for the right conditions to fly her. (This is true of all models)
Last edited:
I like how the Gremlin flies. The one thing that really stands out to me, and after watching that video above is that the plane does stall turns really well, and seems to enjoy them. This is odd only because it has a full symmetrical airfoil, usually such an airfoil hates stall turns IMHO. Fun planes.
Konrad
Very Strong User
This isn't my experience.... This is odd only because it has a full symmetrical airfoil, usually such an airfoil hates stall turns IMHO. Fun planes.
Cambered airfoils give me more problems in the wing over/ stall turn. This is because the outboard wing generates more lift than the inboard wing. With a symmetrical airfoil (zero camber) there is no lift at a zero angle of attack. So the relative speed difference in the wings has little or no roll coupling.
With the Gremlin in the vertical I had very little proverse roll to contend with. Also all that side area right over the CG really gave the rudder something to work against in swinging the tail around.
BTW; the canopy stayed on solidly. I feared that with all that side area it might pop off in any side slip maneuver.
Doc James Hammond
Very Strong User
I have flown one ,Jeremy admittedly a very long time ago. It was not as good as an Aresti. Didn't have the energy retention unless it was full of ballast.I don't think so, My Voltij does superb stall turns.")
Doc.
Diceman
Moderator
I was just commenting on fully symmetrical stall turns, they are much easier to perform then a conventional wing in my opinion. Not to mention they perform them so well you can pivot them on a dime and they perform them very cleanly.
I wasn't comparing fully symmetrical planes, but in lighter conditions the Voltij dominates. Heavier to medium conditions, yes, the Aresti is a faster plane and keeps energy retention well.
I wasn't comparing fully symmetrical planes, but in lighter conditions the Voltij dominates.
Heavier to medium conditions, yes, the Aresti is a faster plane and keeps energy retention well.Doc James Hammond
Very Strong User
I was just commenting on fully symmetrical stall turns, they are much easier to perform then a conventional wing in my opinion. Not to mention they perform them so well you can pivot them on a dime and they perform them very cleanly.
I wasn't comparing fully symmetrical planes, but in lighter conditions the Voltij dominates.
I wonder what the actual weight difference is. I weighed my Aresti, and ready to go with no ballast its 2050g
I'm guessing the Voltage might be a bit lighter, but to be honest I don't think its that much fun to fly am aerobatic model in very light conditions.
I do like the way the French guys make their models though!
Cheers,
Doc.
Diceman
Moderator
Ill weigh it when I get a chance, but it is not "very light conditions" I am stating it flies better than the Aresti in lighter conditions (say 15-20mph and really comes alive the higher you go of course), not very light. I have only flown it up into the 30's (and it flew fantastic even without ballast) and have not tried it in the 40's or higher yet.
I have a Mini Vec and I noticed it flies very similar to the Aresti in my opinion anyways. Of course the Aresti is bigger and holds more ballast, but they fly similar needing to camber in 15-20mph at Coyote hills (not at a bluff of course) for sure vs not having to camber with the Voltij. They both are great aerobatic planes and the Aresti and Mini Vec are much easier to build than the Voltij is for sure. Every plane has it's pros and cons and the Voltij is no longer available I believe, not to mention it is higher priced.
I have a Mini Vec and I noticed it flies very similar to the Aresti in my opinion anyways. Of course the Aresti is bigger and holds more ballast, but they fly similar needing to camber in 15-20mph at Coyote hills (not at a bluff of course) for sure vs not having to camber with the Voltij. They both are great aerobatic planes and the Aresti and Mini Vec are much easier to build than the Voltij is for sure. Every plane has it's pros and cons and the Voltij is no longer available I believe, not to mention it is higher priced.
Doc James Hammond
Very Strong User
Ill weigh it when I get a chance, but it is not "very light conditions" I am stating it flies better than the Aresti in lighter conditions (say 15-20mph and really comes alive the higher you go of course), not very light. I have only flown it up into the 30's (and it flew fantastic even without ballast) and have not tried it in the 40's or higher yet.
I have a Mini Vec and I noticed it flies very similar to the Aresti in my opinion anyways. Of course the Aresti is bigger and holds more ballast, but they fly similar needing to camber in 15-20mph at Coyote hills (not at a bluff of course) for sure vs not having to camber with the Voltij. They both are great aerobatic planes and the Aresti and Mini Vec are much easier to build than the Voltij is for sure. Every plane has it's pros and cons and the Voltij is no longer available I believe, not to mention it is higher priced.
I liked my Buddy's Voltige and flew it quite a bit. It was one of the models I took notice of when designing my Aresti's.
Not sure if they are available now - the French company kind of gets going, then shuts down again from time to time.
Cheers,
Doc.
Just want to throw in my two penneths worth.
I bought a gremlin recently and read online all the different ways it's been assembled.
Thanks to Konrad for his documented build, which highlighted the rudder hinge fraying also present on my newly acquired throw about.
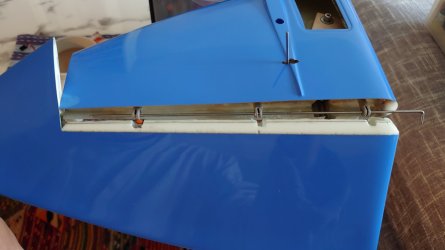
So I committed myself to follow Konrad and modify it to centre hinged with three Robert hinges and a removable wire for easy access if one breaks.
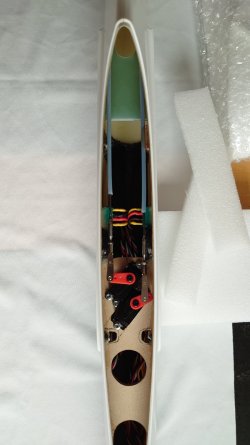
I think I went a little over the top with servo choice, but people say you cannot have too much power. However, this exaggerated the servo access rotation relative to the hinge line. Will need to drill some holes to access the screws if the servos need removing.
A hybrid IDS was used, drilled the plastic rod and inserted a threaded rod with a metal clevis soldered to the other end, adjustable and rigid.
I added additional carbon fibre tows circled around the wing joiner in the fuselage and some cloth along the bottom front in case of a heavy arrival.
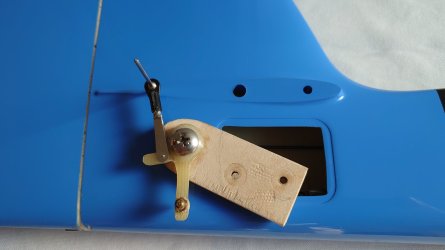
The choice of operating the elevator is with a bellcrank similar to the supplied one with a larger bearing and ball pivots. A soldered centre ball on the actuating wire.
Sticking with the rubber band method of holding the wings in place, I did consider drilling the aluminium pins and just putting a R pin, but it's more things to lose in the grass.
Ballast weight is adjusted by replacing the carbon joiner with 18mm stainless steel, I also bought a metre of carbon tube, cut into three pieces and glued 16mm stainless steel inside to give a selection of weights.
Choice of battery is 3Ah LiIon at 110g, should last a while.
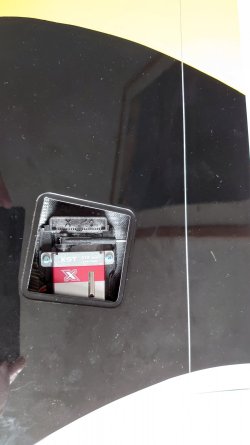
Just putting the covers over all the openings and weighing up the ballast for the nose and ready for a maiden
Then wait for the confinement to finish and a hooligan wind.
Thanks again for all the information here,
Cheers
Niel
I bought a gremlin recently and read online all the different ways it's been assembled.
Thanks to Konrad for his documented build, which highlighted the rudder hinge fraying also present on my newly acquired throw about.
So I committed myself to follow Konrad and modify it to centre hinged with three Robert hinges and a removable wire for easy access if one breaks.
I think I went a little over the top with servo choice, but people say you cannot have too much power. However, this exaggerated the servo access rotation relative to the hinge line. Will need to drill some holes to access the screws if the servos need removing.
A hybrid IDS was used, drilled the plastic rod and inserted a threaded rod with a metal clevis soldered to the other end, adjustable and rigid.
I added additional carbon fibre tows circled around the wing joiner in the fuselage and some cloth along the bottom front in case of a heavy arrival.
The choice of operating the elevator is with a bellcrank similar to the supplied one with a larger bearing and ball pivots. A soldered centre ball on the actuating wire.
Sticking with the rubber band method of holding the wings in place, I did consider drilling the aluminium pins and just putting a R pin, but it's more things to lose in the grass.
Ballast weight is adjusted by replacing the carbon joiner with 18mm stainless steel, I also bought a metre of carbon tube, cut into three pieces and glued 16mm stainless steel inside to give a selection of weights.
Choice of battery is 3Ah LiIon at 110g, should last a while.
Just putting the covers over all the openings and weighing up the ballast for the nose and ready for a maiden
Then wait for the confinement to finish and a hooligan wind.
Thanks again for all the information here,
Cheers
Niel
Attachments
Doc James Hammond
Very Strong User
Great job Neil.Just want to throw in my two penneths worth.
I bought a gremlin recently and read online all the different ways it's been assembled.
Thanks to Konrad for his documented build, which highlighted the rudder hinge fraying also present on my newly acquired throw about.
So I committed myself to follow Konrad and modify it to centre hinged with three Robert hinges and a removable wire for easy access if one breaks.
I think I went a little over the top with servo choice, but people say you cannot have too much power. However, this exaggerated the servo access rotation relative to the hinge line. Will need to drill some holes to access the screws if the servos need removing.
A hybrid IDS was used, drilled the plastic rod and inserted a threaded rod with a metal clevis soldered to the other end, adjustable and rigid.
I added additional carbon fibre tows circled around the wing joiner in the fuselage and some cloth along the bottom front in case of a heavy arrival.
The choice of operating the elevator is with a bellcrank similar to the supplied one with a larger bearing and ball pivots. A soldered centre ball on the actuating wire.
Sticking with the rubber band method of holding the wings in place, I did consider drilling the aluminium pins and just putting a R pin, but it's more things to lose in the grass.
Ballast weight is adjusted by replacing the carbon joiner with 18mm stainless steel, I also bought a metre of carbon tube, cut into three pieces and glued 16mm stainless steel inside to give a selection of weights.
Choice of battery is 3Ah LiIon at 110g, should last a while.
Just putting the covers over all the openings and weighing up the ballast for the nose and ready for a maiden
Then wait for the confinement to finish and a hooligan wind.
Thanks again for all the information here,
Cheers
Niel
Now we are all waiting for your maiden. Its a fun little plane.
Cheers,
Doc.
Konrad
Very Strong User
Thank you for posting your set up.
Interested to find out how much lighter the front tray mounted servos might make the Gremlin set up.
I think the mini X10 is the appropriate size servo. The aileron servo pocket is mis placed. As a result I only used the two mounting screws visible from the cover. This might have cost me some stability in the mounting of the servo. But with the added bearing support I doubt I'll notice it at the anticipated loads.
Please learn from my mistakes. Add a fairing or tail skid to protect the bottom of the rudder.
Last edited:
Konrad
Very Strong User
Where did the week go? I bent my Gremlin on Sunday, and I'm only now getting around to repairing her.
I removed the tail post to help with the removal of the damaged hinge and to help reset the hinges. I'm taking the opportunity to show how the elevator servo and arm look installed in the fin.
I removed my grossly over weight gap wipers. I measured 7 grams of epoxy. I hope to be able to add another set of wipers only adding about 4 grams of epoxy.
Konrad
Very Strong User
Had some big air this afternoon at Mussel Rock. Hadn't finished with the rudder repair from the maiden (still need to replace the wipers). But with the lift I couldn't let a day like that pass without trying to get in some flights.
Well she is a real fun ship. I'd like bit more roll rate, just for the wow factor. But with the internal limits with the IDG I'm not likely to get that. Doc's airfoil is very responsive at the beginning of the throw. That is to say I needed to use a lot more expo than I usually use (Normally I don't any expo). I'd never have guessed it but I need to find some ballast bars.
I did notice that my rudder response was a lot less than what I had on the maiden. I attribute this to the huge rudder gap without the wipers installed.
While I'm still feeling out the Gremlin, I'm thinking that the elevator response and stability is a bit light. But I did have full control. Don't know if this was a balance issue or other trimming issue. More work to do once I get the wipers reinstalled.
Last edited:
Similar threads
- Replies
- 5
- Views
- 2K