
Aloft Forums
You are using an out of date browser. It may not display this or other websites correctly.
You should upgrade or use an alternative browser.
You should upgrade or use an alternative browser.
Soaring USA gift certificate (Strega purchase?)


Konrad
Very Strong User
Well, that hope was short lived!RCRCM website has been down for a while, I guess they lost there last customer
It looks like RCRCM is back up and running!


RCRCM Aero Team-RC Glider,Sailplanes,F3B,F3F,F3J
Rc Glider,Rc Sailplane,Rc Slope,Rcglider,RCsailplane,Glider Kits,sailplane KITS,Glider Plane,sailplane,F3F,F3B,F3J,F3K,Electric Glider,rc motor glider
 www.rcrcm.com
Friends don't let friends buy RCRCM products,
Konrad
Konrad
Very Strong User
How NOT to trim an F3F ship, even one as poorly made as an RCRCM ship!
I’ve only had 4 or 5 flight on my RCRCM Strega that weren’t racing heat rounds! This means that I’ve haven’t given near enough time for sorting out the trim state of the model. I have to thank Doc for giving me good set up data as to actually being able to race Strega with as little trimming as I’ve given her.
Per Doc’s instruction I raised the LE of the stab about 1.5mm. This was a move in the correct direction. But I have to admit that I was carrying a bit of up trim and a bit of rudder offset. Nothing much just a bit. Now to a man, every guy I had helping me launch into an F3F heat noticed the elevator offset and ask if this is what I wanted. They were checking to make sure I didn’t have the wrong set up (program) selected in my radio.
I’m using a CofG location of 115mm. This feels good to me, but is right at the tuck point in the dive test. So I’m confident that I’m not likely to go any further aft in my trimming for the CofG. So I’ve decided to take out this up trim and add the rudder correction to try to bring all ruddervators into profile with the V tail. This meant that I had to take out some of the LE correction I had given the left V tail.
Per Doc’s instructions I tried to raise the LE 1.5mm. With my CofG I feel that I should lower the left V tail to a corrected value of 1mm. These corrections are easy enough to do. It just take a while waiting for the epoxy in the alignment holes to set and harden.
With any luck I’ll have good winds and time to actually test fly my Strega tomorrow.
Friends don't let friends buy RCRCM products,
Konrad
Last edited:
Konrad
Very Strong User
It pains me to admit this but this time the failure of my Strega’s fuselage structure was pilot induced.
On my landing approach I failed to get the nose turned around soon enough into the wind prior to making contact with the ground. As a result I landed sideways with a large slip component, about 8 meters per second. I’m actually glad the fuse broke as I was carrying a load of full ballast. Had the fuselage not broken I fear the wings would have had to absorbed a lot more stress. Remember this ship is a much weaker glass lay up. I can report that the front of my Strega has some Kevlar in the lay up. With the general quality issues I’ve had with RCRCM this was a pleasant surprise. If the yellow fibers almost refuses to sand but rather fuzz up in all likelyhood the fiber is Aramid.
The repair has been to piece the 3 major fuselage pieces back together with CA glue. I’ve made a rear bandage from 3 layers of carbon after sanding off the paint and cutting into some of the parent glass.
The front of the fuselage is now ready for an inside bandage of Kevlar. After this patch has cured I will finish sanding the outside of the nose to add two layers of 2 oz cloth. As Kevlar is susceptible to UV deterioration I will also add a layer of 2 oz cloth to the inside of the fuselage. I hope that with the patches on both sides of the center of gravity there won’t be too much of a shift in the CG.
Now here is a dirty little secret about composite ships. It costs an arm and a leg to properly repair them. This is not a $20 roll of Oracover type repair! What you see here is 1/2 a gallon of paint and supplies for a cost of around $250. I happen to have most of the fiber material on hand. But I needed to get paint. I haven’t paint professionally in over 45 years. Let me tell you things sure have changed! Like we (they) now paint with water colors! Ok, they are catalyzed polyurethane water based paints. As odd as it sounds these paints are better for the environment but are more toxic as the body is faster at absorbing water based contaminates than most solvent poisons. I went with a solvent paint as I don’t have a possitive pressure suit. I NEED TO LEARN TO LAND BETTER! It is costing me far too much in time and materials to repair my ships.
Last edited:

Konrad
Very Strong User
I’m deep in repair mode. And with the purchase of a lot of paint I’m actually giving the esthetics some priority. I have found a lot of stress cracks (splitting of the balsa skin). I’m chasing these cracks by sanding away the paint. injecting thin CA and allowing the capillary action of the CA to follow the splits. I then cover the cracked area with 2 layers of 0.7oz glass cloth, sand fill and prime.
I’m noticing that the glass RCRCM is using looks to be laced with horse hair every 30mm or so (See green arrows). I’m told this is a mill code for lower grade fiberglass. Even the E-glass I’ve used didn’t have these darker threads running in the weave. I wouldn’t be at all surprised to learn that RCRM is not using S-glass in their lay up! This is why I was warned not to buy an RCRCM product. But if one did, buy an RCRCM product, make sure it is the carbon lay up! Can anybody tell me what if any is the significance of these colored fibers in the glass weave?
While I was sanding back the paint I thought I’d address an issue that has been bugging me. That Is I didn’t sign a marketing agreement with RCRCM so I hated having their name on my ship! So I’m taking care of this issue. I not sure it will have the impact I want when it come time to sell these Strega’s. But I’m sure it will help me with my "pride of ownership” if RCRCM’s name isn’t on my model.
I do need to give RCRCM a shout out for at least giving the paint job a base coat of white. This helps a lot with coverage and the brilliance of the finish.
All the best,
Konrad
Last edited:
Konrad
Very Strong User
Continuing with trying to make a silk purse out of a sow’s ear. I pieced together the nose of my RCRCM Strega with CA. I then laminated a layer of 5.7 oz Kevlar on the inside with hard epoxy. When this cured I then used 5 layers of 0.7oz glass on the outside. I like to use a lot of fine layers of cloth as it helps feather in the repair. Now I had a bit of a problem maintaining the canopy recess. In the end I had to use some wood carving tools to maintain this feature. Have you guys had any luck masking this feature prior to laying up glass cloth?
All the best,
Konrad

All the best,
Konrad
Konrad
Very Strong User
I have some question I’m hoping someone in the Aloft hive mind might be able to answer.
Why do so many canopies have what looks like inappropriate use of carbon fiber. In the RCRCM Strega canopy there are two strips of carbon on each side of the full length hold down wire. Doesn’t the wire itself add stiffness? Heck the canopy itself appears to be a heavy glass layup not in need of additional support.
On a broader question that I'm hoping a paint chemist and or RF engineer might help. I assume that most black pigments are carbon. I assume that these carbon pigment particles will impede 2.4 gHz signals to some degree. So the question I have are pigments often metallic (Lead, Titanium, Aluminum, Iron etc.)? And wouldn’t a coating of these pigments interfere with the antennas underneath the canopy?
All the best,
Last edited:
Konrad
Very Strong User
Earlier I thought I was making a bad joke when I suggested that RCRCM fiberglass was laced with horse hair. After sanding off the black paint on my canopy it looks like that may have been an acurate assesment! The glass is laced with fibers that don’t even follow the warp and weft of the cloth!

Konrad
Very Strong User
Working on the white RCRCM Strega. With the lessons learned on the Yellow Strega I’ve offset the servo 1.5mm from the center line to allow the forward pushrod to clear the aft servo’s output shaft, without needing to kink the push rod. To minimize the chance of pushrod interference with the wing joiner I’ve tried to place the servo tray as deep as possible in the fuselage. To do this I’m using the servo themselves as my height gage for placement of the servo tray. To give some clearance should there be variability with the servo mounting I’ve taped the bottom of the servo with 0.1mm thick tape. After the tray’s glue has cured I will remove the servo and the tape. reinstalling the servo without the tape will result in 0.1mm clearance between the servo case and the fuselage.
I also learned that I like the CofG to be around 110mm 112mm from the LE. This means that the ballast tube can be moved forward 5mm to aid in the changing out of ballast and not result in a nose heavy ship at full ballast. On the yellow Strega I gave myself 5mm aft leeway should I find that I liked the CofG further aft than 115mm. At 110mm my Strega is starting to tuck in the dive test.
What a pain it is getting the servo leads to clear servo trays!
Friends don't let friends buy RCRCM products,
Konrad


F
I also learned that I like the CofG to be around 110mm 112mm from the LE. This means that the ballast tube can be moved forward 5mm to aid in the changing out of ballast and not result in a nose heavy ship at full ballast. On the yellow Strega I gave myself 5mm aft leeway should I find that I liked the CofG further aft than 115mm. At 110mm my Strega is starting to tuck in the dive test.
What a pain it is getting the servo leads to clear servo trays!
Friends don't let friends buy RCRCM products,
Konrad
F
Last edited:
Konrad
Very Strong User
This means it has what properties?Typically when you see those traces like that it is due to the manufacturer using fiberglass that is intended for circuit boards.
All the best,
Konrad
Last edited:

What I have been told is the glass manufacturers put these traces into the fiberglass to warn people that is it not a structural fiberglass. I do not know if there is much fact behind that and I do not recall where or when I was told this. I suspect it was back when I was building a FlyFly kit as that was the first plane I ever saw these traces in. That Flyfly glider was the worst example of an RC Glider I had even run across. Beyond horrible! Makes your RCRCM issues look like aerospace quality work.
Konrad
Very Strong User
I’m sure you all are getting bored with all the failings I keep finding in the RCRCM product. Just imagine my frustration, every time I think I have put a problem behind me it seems to reappear!
I thought I had repaired the structural short comings from both in the manufacturing flaws and crash damage and was ready to start the refinishing work. Then I find another soft spot in the fuselage lay up. One of the issues with wet seam construction is getting adequate fiber content to cross the part line and adhered to the other side. I’d like to think that what I found was just such an issue. That the fibers just failed to cross the part line. Unfortunately the area where there is no fiber corresponds to the area where the weight of the “V”-tail would place the maximum stress on the tail boom during a nose in stop. It appears that RCRCM knows exactly where to place manufacturing flaws to maximum the detrimental effects to help with parts sales!
Again I had to sand the part line to remove the paint, and add layup 3 layers of carbon tissue (random fibers) across the part line. Now the part line feels uniform down the full length of the seam.
Friends don't let friends buy RCRCM products,
Konrad
Konrad
Very Strong User
I just came back from sport flying my Strega. She is slowly getting better (read I'm getting better at trimming her). I've now taken out half the down trim I added to take care of the "incidence" issue. the elevators and stabilized are now close to being in line using my preferred CG. At speed she does start to tuck.
All I can think of is that the TOTAL change from the OEM setting is to raise the front of stab 1.5mm above the rear of the stab. I raised the LE approximately 1.5mm pivoting around the main mounting pins, for about 3mm total change. Flight testing is indicating that this was about twice what "I" needed.
Today I was flying at Thornton Beach in 37mph winds. At my max weight of 117 oz (3.32kg) I was still too light. I'm getting the aileron differential dialed in so that she comes back to me at the same level as she entered the turn. I'm also finding I don't need near the snap flap I've been using.
Like I've said even as much as I hate the quality of the RCRCM Strega she still has a lot to teach me.
I did a lot of work on setting up the landing program. And if I say so myself it is starting to show, the last 5 landing I've been able to plant the ship within 2 meters of where I want. This has cut down on the rework a lot!
Friends don't let friends buy RCRCM products,
Konrad
Last edited:
P
Prayoub1
Guest
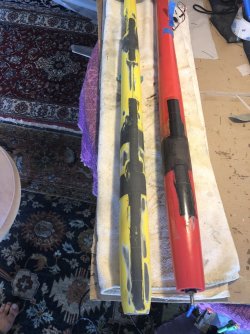
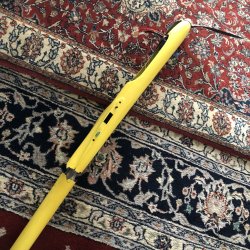
I just completed my second flight in my strega. The first was a hard landing on the nose that resulted in a multi point break in the cockpit. The yellow plane is the Strega after some work.One wing split alone it entire length that was an easy epoxy back together. Some CF and time and she looked good as new and was stonger for sure. I now knew that she wants up elevators on flaps, not down like my t tail f5j! The second flight was a windy day and I felt she was set up good. I ran a 4s with plenty of power this time! She came in really smooth and a little fast on a grass landing. I thought it was a nice "hot" clean landing. At the end it jumped a bit and the fuse just split in half right behind the wing as it was coming to a stop. Like Whaat just happened. I have dorked my share of quality f5j ships to know when to expect some damage, but this thing is a joke. My first and last model from this manufacturer.
Attachments
Konrad
Very Strong User
Mine are both F3F models. I have add 5.7 oz Kevlar to the cockpit tub of my Stregas. I think with as much carbon as you are showing that I often need to bring the antennas to the outside of the fuselage.
As to elevator comp. With "crow" I need to add down. A lot at the beginning of the flap deployment. My CG is around 112mm. While I got a great deal on my two from SoaringUSA it really has taken far too much work to correct the design and quality issues found in my Stregas and/or any other RCRCM model.
Like you say NO MORE from this manufacture!!!
All the best,
Konrad
P.S.
Are your Stregas both OEM carbon ships. Mine are glasss, but seeing how yours perform it doesn't look like black fiber (I assume that would be carbon under the paint) is any better.
Last edited:

