What's new
Aloft Forums

This is a sample guest message. Register a free account today to become a member! Once signed in, you'll be able to participate on this site by adding your own topics and posts, as well as connect with other members through your own private inbox!

Cassiopeia Sera-DX and Sera-Sailing

Motowncali

Active User
Joined
May 9, 2018
Messages
186
Reaction score
43
Location
Napa
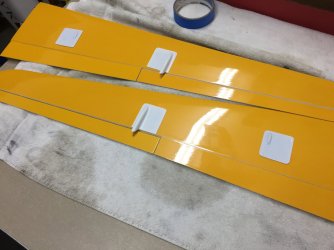
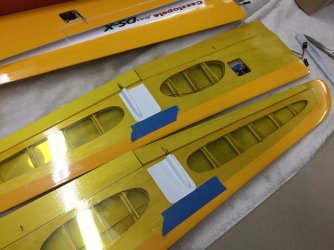
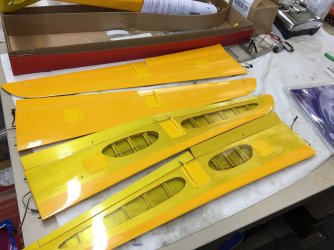
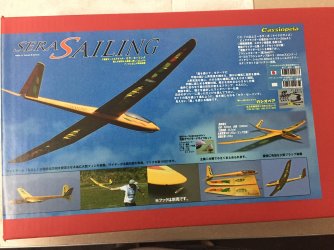
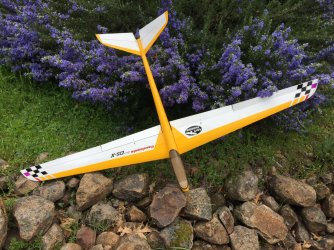
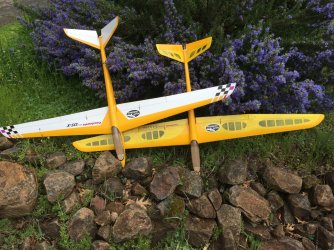
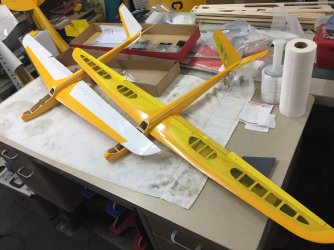
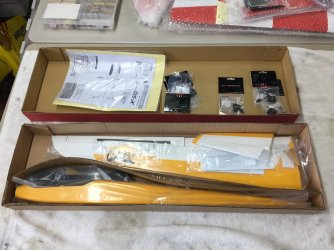
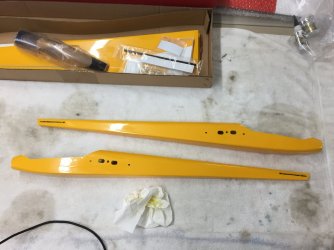
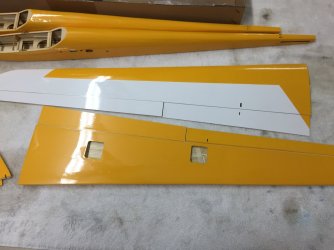
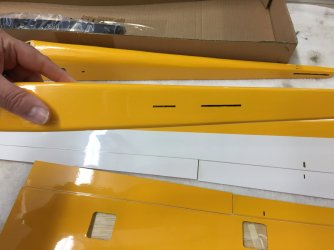
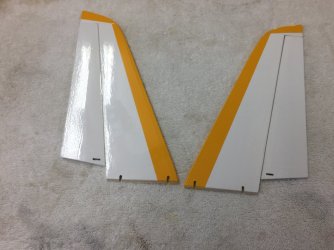
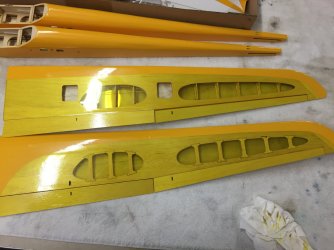
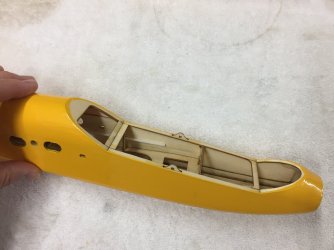
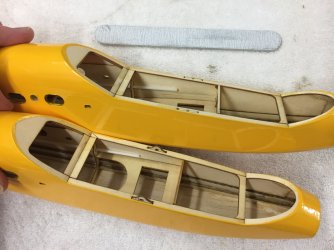
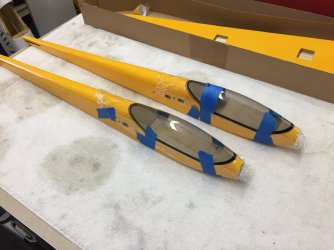
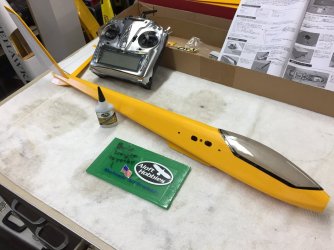
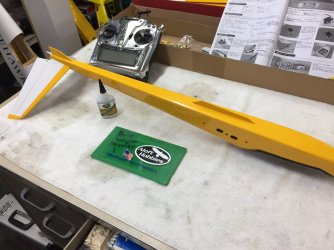
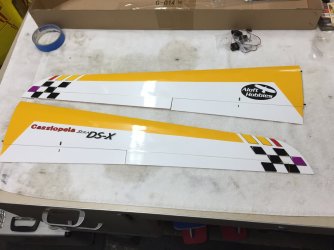
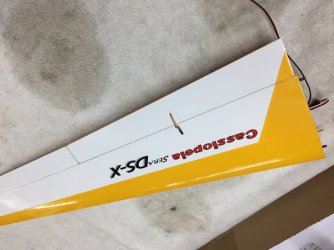
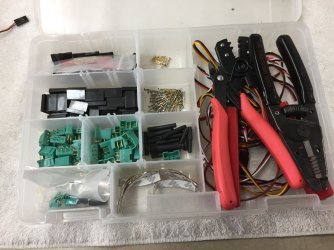
A new line of gliders that Aloft is bringing in from Japan. I saw these on the floor and when I started talking to Wayne, the next thing I knew, we were picking out servos and talking about the build!
 

Attachments

  • EAF2A9C6-2A67-4563-8F18-5D37B9021D25.jpeg
    EAF2A9C6-2A67-4563-8F18-5D37B9021D25.jpeg
    249.3 KB · Views: 402
  • A49B7182-3FBA-431E-B658-52B2BF836EAD.jpeg
    A49B7182-3FBA-431E-B658-52B2BF836EAD.jpeg
    286.7 KB · Views: 412
  • 22E41E80-134B-4A56-BCDD-CAD5AA96AB59.jpeg
    22E41E80-134B-4A56-BCDD-CAD5AA96AB59.jpeg
    339.5 KB · Views: 476
  • 6C1741BC-2134-4748-A300-090CEB0CA091.jpeg
    6C1741BC-2134-4748-A300-090CEB0CA091.jpeg
    266.7 KB · Views: 426
  • 1A170FC4-DDDC-40C3-9839-F183AF200EFA.jpeg
    1A170FC4-DDDC-40C3-9839-F183AF200EFA.jpeg
    568.8 KB · Views: 471
  • F88AB2DB-934B-4B39-A2DA-51931EB9FA62.jpeg
    F88AB2DB-934B-4B39-A2DA-51931EB9FA62.jpeg
    598.4 KB · Views: 384
  • B934690F-1D34-45BB-B8AA-144B4BF6C0E2.jpeg
    B934690F-1D34-45BB-B8AA-144B4BF6C0E2.jpeg
    548.5 KB · Views: 453
  • D646AE5B-9FEE-4A3C-AF78-786485ED9D58.jpeg
    D646AE5B-9FEE-4A3C-AF78-786485ED9D58.jpeg
    580.7 KB · Views: 434

Motowncali

Active User
Joined
May 9, 2018
Messages
186
Reaction score
43
Location
Napa
The first thing I did was a quick dry fit of the parts, very nice! Then I put my junk tip in my soldering iron and set it to 500 degrees, to clear the covering out of all the holes. Monokote iron to reattach the covering along a few edges was just over the medium setting.
 

Attachments

  • F8786880-0086-4CB8-8ACE-1E46B113DDC3.jpeg
    F8786880-0086-4CB8-8ACE-1E46B113DDC3.jpeg
    266.7 KB · Views: 429
  • 3FD47A12-8A58-4746-85E9-4CD4C39CFBB0.jpeg
    3FD47A12-8A58-4746-85E9-4CD4C39CFBB0.jpeg
    294.2 KB · Views: 464
  • 28C72C68-A7AE-4AC5-999D-D1AF7B82BDF8.jpeg
    28C72C68-A7AE-4AC5-999D-D1AF7B82BDF8.jpeg
    243.7 KB · Views: 478
  • CE02D8AB-B712-4C2D-A45D-CFCECF4AEF14.jpeg
    CE02D8AB-B712-4C2D-A45D-CFCECF4AEF14.jpeg
    229.2 KB · Views: 418
  • 159581F8-599F-49D2-856F-10C4B7E13EB0.jpeg
    159581F8-599F-49D2-856F-10C4B7E13EB0.jpeg
    165.3 KB · Views: 461
  • AB65C424-FA09-408D-9AFA-496C157A03CB.jpeg
    AB65C424-FA09-408D-9AFA-496C157A03CB.jpeg
    254.5 KB · Views: 377
  • 35519D99-FEBD-40B5-92E0-611ADA5710D6.jpeg
    35519D99-FEBD-40B5-92E0-611ADA5710D6.jpeg
    249.5 KB · Views: 406
  • 2CDFE33F-AB5D-43D7-8248-1A4D99E2AF01.jpeg
    2CDFE33F-AB5D-43D7-8248-1A4D99E2AF01.jpeg
    264.2 KB · Views: 401
  • FAD3A231-BF72-4906-9CF4-1E9545CEA0B5.jpeg
    FAD3A231-BF72-4906-9CF4-1E9545CEA0B5.jpeg
    157.5 KB · Views: 385

Motowncali

Active User
Joined
May 9, 2018
Messages
186
Reaction score
43
Location
Napa
The canopy has a carbon rod that slides through two pieces of fuel tubing and fits into tabs on the fuse. You drill two holes in the canopy for the rod, simple, but not clean! This was unacceptable to either of us, so I cut the tabs off. Build a canopy floor out of 1/32 ply and used 4 magnets to attach the canopy. The clear section is attached with canopy glue, or RC56. A small pilot bust would have been cool to add, but I don’t have dolls laying around... The fuses for both planes are the same, different tail feathers and wings, but the rest is the same, so I made two of all parts.
 

Attachments

  • 13D0438F-885B-4710-9526-C6B41ED35E3B.jpeg
    13D0438F-885B-4710-9526-C6B41ED35E3B.jpeg
    240.9 KB · Views: 400
  • 96AC82F0-C31E-4DA0-A5AF-11EA5E9B796B.jpeg
    96AC82F0-C31E-4DA0-A5AF-11EA5E9B796B.jpeg
    255.5 KB · Views: 396
  • DCD2E610-7026-4A33-AB4C-AAFE2353D825.jpeg
    DCD2E610-7026-4A33-AB4C-AAFE2353D825.jpeg
    239.8 KB · Views: 402
  • 8133CBC9-0F07-4A20-82F8-CFC7C44B77A3.jpeg
    8133CBC9-0F07-4A20-82F8-CFC7C44B77A3.jpeg
    234.9 KB · Views: 388
  • F5501A00-275F-488A-843C-3AEF2745222B.jpeg
    F5501A00-275F-488A-843C-3AEF2745222B.jpeg
    177.8 KB · Views: 372
  • 9CAF2550-C874-45F4-8559-3EC8329C532F.jpeg
    9CAF2550-C874-45F4-8559-3EC8329C532F.jpeg
    222.2 KB · Views: 362
  • 643B0532-BC53-4B1D-9D19-0A16869C4D14.jpeg
    643B0532-BC53-4B1D-9D19-0A16869C4D14.jpeg
    212.8 KB · Views: 375
  • 97C9FECE-326B-44B4-BB97-C35B96AE999F.jpeg
    97C9FECE-326B-44B4-BB97-C35B96AE999F.jpeg
    245.8 KB · Views: 368
  • 9CB233C2-5E32-4676-BAC9-0B63D06F4962.jpeg
    9CB233C2-5E32-4676-BAC9-0B63D06F4962.jpeg
    237.3 KB · Views: 360
  • 5DA376D5-379E-40DD-BA47-E1E625735578.jpeg
    5DA376D5-379E-40DD-BA47-E1E625735578.jpeg
    184.9 KB · Views: 372

Motowncali

Active User
Joined
May 9, 2018
Messages
186
Reaction score
43
Location
Napa
Next up was installing the V-tail servos, this required a small adapter plate for the KS DS47MG servos we used. The servo plate in the plane is not glued from the factory so you can adjust the height after mounting the servos and putting the control rods to the tail in the plane. This was very slick, you can’t remove the tray, but just a little CA once everything is aligned! I cut an opening under the tail for the fin underneath. There is a center and tail fin that stick out the bottom, to me they look like “Shark Fins”. This also made it very easy to glue the V-tail halves in alignment. I put the wings on to ensure the tail was aligned to the wing and used the TLR meathod for alignment. 110-120 degrees on a V tail looks good. I used BSI Gold CA to glue the tails and fins on. No fumes on the covering this way. To keep the pushrods in the horns at the tail, I used Dubro .035 ez links, I had to open the hole to 1mm, but I wasn’t going to wait to get 1mm versions from China.
 

Attachments

  • 8D2D6EF8-53F3-477A-81C7-B58D26C5D473.jpeg
    8D2D6EF8-53F3-477A-81C7-B58D26C5D473.jpeg
    173 KB · Views: 398
  • 59D0AA72-31AA-4D5A-A8EC-4FD027B0303B.jpeg
    59D0AA72-31AA-4D5A-A8EC-4FD027B0303B.jpeg
    293.2 KB · Views: 397
  • 1FFF2FAE-3750-402A-9F59-5101E56B74E2.jpeg
    1FFF2FAE-3750-402A-9F59-5101E56B74E2.jpeg
    263.2 KB · Views: 441
  • B8E8A4DC-2821-40F9-9A54-8F51A08B85BD.jpeg
    B8E8A4DC-2821-40F9-9A54-8F51A08B85BD.jpeg
    299.3 KB · Views: 397
  • 5B6A3D73-95EB-4131-AD09-601F655808B4.jpeg
    5B6A3D73-95EB-4131-AD09-601F655808B4.jpeg
    129.4 KB · Views: 421
  • 38795103-3261-4B6C-9794-33B55CD52D3F.jpeg
    38795103-3261-4B6C-9794-33B55CD52D3F.jpeg
    288 KB · Views: 398
  • 1902BF30-0D66-4262-A937-071C0B3F336F.jpeg
    1902BF30-0D66-4262-A937-071C0B3F336F.jpeg
    282 KB · Views: 416

Motowncali

Active User
Joined
May 9, 2018
Messages
186
Reaction score
43
Location
Napa
I applied the graphics with a sprits of alcohol and a squeegee. The graphics for the DS are cool, not so much for The Sailing, so it didn’t get any. Besides transparent covering looks cool! Nothing special about the servo install, just took my time, measured it out and used Z-bent pliers for the ailerons and just a right angle bend for the flaps. A couple drops of CA to bond the servo to the wing skin. Don’t get crazy, the CA can get into the servo and bind up the gears. I use an 18 gauge tip on my glue bottles to use it sparingly.
 

Attachments

  • 77676217-D8C9-491C-B238-818D38FE08A0.jpeg
    77676217-D8C9-491C-B238-818D38FE08A0.jpeg
    209.2 KB · Views: 371
  • 211EBD56-8579-45C8-B912-D36733566482.jpeg
    211EBD56-8579-45C8-B912-D36733566482.jpeg
    215.2 KB · Views: 480
  • FC46BB65-1A7D-49B5-BEB8-181742CEECA5.jpeg
    FC46BB65-1A7D-49B5-BEB8-181742CEECA5.jpeg
    568.8 KB · Views: 423
  • F87B7B26-5D23-42C0-8454-FB8D7079F2A3.jpeg
    F87B7B26-5D23-42C0-8454-FB8D7079F2A3.jpeg
    128.3 KB · Views: 456
  • 5735AD79-37FE-43BA-9942-96F487AF3F64.jpeg
    5735AD79-37FE-43BA-9942-96F487AF3F64.jpeg
    139.5 KB · Views: 383
  • 5ADEF224-29E0-41D5-9420-926B356D333D.jpeg
    5ADEF224-29E0-41D5-9420-926B356D333D.jpeg
    140.4 KB · Views: 428
  • DDA8C7BF-907D-416E-B259-7CDD54D648E6.jpeg
    DDA8C7BF-907D-416E-B259-7CDD54D648E6.jpeg
    119.2 KB · Views: 367
  • 6EB30545-CAEB-4D53-A2D5-393FAC48375D.jpeg
    6EB30545-CAEB-4D53-A2D5-393FAC48375D.jpeg
    250 KB · Views: 380
  • E47C10FD-084B-445E-AABA-763938A72DD7.jpeg
    E47C10FD-084B-445E-AABA-763938A72DD7.jpeg
    120.7 KB · Views: 393
  • 92A4A794-A408-4561-A5CB-6909601E98BC.jpeg
    92A4A794-A408-4561-A5CB-6909601E98BC.jpeg
    119.8 KB · Views: 366

Motowncali

Active User
Joined
May 9, 2018
Messages
186
Reaction score
43
Location
Napa
And now onto the Sera Sailing. Just a repeat of the work done on the SeraDX. I did need make up the extensions for the aileron servos. The flaps stick out the perfect amount. 10” Leads to put in the fuse are on order and will be here soon. Crimping servo ends is not difficult, but requires patience and practice. After 20 years of electronic assembly, I have soldered and crimps a lot of wire!
 

Attachments

  • F5D67203-3A2B-4940-B9DF-FB1418947041.jpeg
    F5D67203-3A2B-4940-B9DF-FB1418947041.jpeg
    280.8 KB · Views: 371
  • E8E97C59-DEA0-41F2-A895-96B1FDE82DBC.jpeg
    E8E97C59-DEA0-41F2-A895-96B1FDE82DBC.jpeg
    201.4 KB · Views: 347
  • 547B86FA-75E2-475C-BB88-655D6D97A0CC.jpeg
    547B86FA-75E2-475C-BB88-655D6D97A0CC.jpeg
    182.6 KB · Views: 357
  • 3C86CE85-E763-4580-A166-84DBEBF3E516.jpeg
    3C86CE85-E763-4580-A166-84DBEBF3E516.jpeg
    276.6 KB · Views: 346
  • 19373F7E-B865-4188-914E-AA9852888035.jpeg
    19373F7E-B865-4188-914E-AA9852888035.jpeg
    276.7 KB · Views: 334
  • CC8BB04A-C480-47A4-8F0E-FA2439748A5F.jpeg
    CC8BB04A-C480-47A4-8F0E-FA2439748A5F.jpeg
    161.4 KB · Views: 320
  • 2E527C07-714E-429B-9467-4AC02F6115A9.jpeg
    2E527C07-714E-429B-9467-4AC02F6115A9.jpeg
    163.8 KB · Views: 346
  • 101DBAD9-6089-4347-A0B1-8003D8CD8B0F.jpeg
    101DBAD9-6089-4347-A0B1-8003D8CD8B0F.jpeg
    288.1 KB · Views: 345
  • C67B3867-7EAD-479B-9392-6D7589648E2D.jpeg
    C67B3867-7EAD-479B-9392-6D7589648E2D.jpeg
    265.1 KB · Views: 342
  • 1EBFB513-B5D9-4BE7-87A3-3AFDF8AA9E0F.jpeg
    1EBFB513-B5D9-4BE7-87A3-3AFDF8AA9E0F.jpeg
    323.9 KB · Views: 361

Motowncali

Active User
Joined
May 9, 2018
Messages
186
Reaction score
43
Location
Napa
Just a dot of CA on one corner of the servo, with the control rod in place. Then I put a dot with a silver sharpie where I need to bend it. Carefully hold with pliers and make the bend. Cut off the excess and deburr with a nail file. Slide into control horn and retract to see how you did, once satisfied with location, finish CAing the servo in, if you bent the wire slightly off, pop the one drop of CA and realign the servo and CA into place. Remember, just a couple drops goes a long way!
 

Attachments

  • B8186ECE-E422-40FB-BE31-D0F2B231852C.jpeg
    B8186ECE-E422-40FB-BE31-D0F2B231852C.jpeg
    133.3 KB · Views: 326
  • 4BEB2004-81E9-4DEE-9CA6-E4A7F43818E0.jpeg
    4BEB2004-81E9-4DEE-9CA6-E4A7F43818E0.jpeg
    210.1 KB · Views: 331
  • 059BA9FC-66A4-4E06-A486-293C7AB4781F.jpeg
    059BA9FC-66A4-4E06-A486-293C7AB4781F.jpeg
    164 KB · Views: 315
  • DCF38218-3E40-4350-A213-24E15CD0608C.jpeg
    DCF38218-3E40-4350-A213-24E15CD0608C.jpeg
    109.6 KB · Views: 334
  • F20A5DB7-2829-46A7-AD23-6555725C3F3C.jpeg
    F20A5DB7-2829-46A7-AD23-6555725C3F3C.jpeg
    145 KB · Views: 343
  • F39005C7-05FA-4877-9499-5E95B43ADDC0.jpeg
    F39005C7-05FA-4877-9499-5E95B43ADDC0.jpeg
    274.2 KB · Views: 304
  • 2778238F-9D87-4A06-AD4E-BC9112844053.jpeg
    2778238F-9D87-4A06-AD4E-BC9112844053.jpeg
    212 KB · Views: 359
  • EE1C30FC-34BC-475D-88DC-C5C163A56762.jpeg
    EE1C30FC-34BC-475D-88DC-C5C163A56762.jpeg
    183.3 KB · Views: 326

Motowncali

Active User
Joined
May 9, 2018
Messages
186
Reaction score
43
Location
Napa
I found some paint that is close to the correct color... white just didn’t look right.
On the SeraSailing, I cut the flap covers from some flat plastic I have, and the aileron covers are glass from Aloft.
On the Sera DS-X, I modified the factory flap covers by warming them up and fattening them back out, left the bump for the servo horn. The aileron covers are glass from Aloft.
Please not the difference in cover shapes on each plane. The servos on the DS-X are closer to the trailing edge since the wing has a bit more taper.
 

Attachments

  • C78673E8-9712-4C0D-8966-8C739139725C.jpeg
    C78673E8-9712-4C0D-8966-8C739139725C.jpeg
    229.5 KB · Views: 362
  • AD7C29EB-90BF-4CC5-9957-BBCFAF2FEF44.jpeg
    AD7C29EB-90BF-4CC5-9957-BBCFAF2FEF44.jpeg
    247.8 KB · Views: 326
  • BA473485-7670-41F1-B8D5-0510CB0533ED.jpeg
    BA473485-7670-41F1-B8D5-0510CB0533ED.jpeg
    232.4 KB · Views: 339
  • 22044EE0-F7B3-4AA8-9A29-BBE7B5FA1706.jpeg
    22044EE0-F7B3-4AA8-9A29-BBE7B5FA1706.jpeg
    262.5 KB · Views: 357

Konrad

Very Strong User
Joined
Jan 23, 2018
Messages
7,822
Reaction score
1,488
Location
San Francisco
Can you show why the flap geometery is so different as to why one set of wings needs the jelly bean servo cover and the other does fine with a flate plate?

Are these the fiberglass servo hoods?

Are the flaps and ailerons solid balsa (TE stock) or are they built up?
 

Motowncali

Active User
Joined
May 9, 2018
Messages
186
Reaction score
43
Location
Napa
The Geometry is the same on both planes, but the Sailing version, transparent wings are thicker.

Yes, those are the covers that I used for the ailerons. The stock covers are mad to accommodate thicker servos.
 

Motowncali

Active User
Joined
May 9, 2018
Messages
186
Reaction score
43
Location
Napa
Made it so that the nose cones can be removed and replaced if necessary. The DX took about three times as much weight to achieve CG.
 

Attachments

  • 1C4630C9-5535-480B-85E4-2896CD222406.jpeg
    1C4630C9-5535-480B-85E4-2896CD222406.jpeg
    181.4 KB · Views: 391
  • 43814D0F-4C8D-46CD-995B-EE01B3AB66AD.jpeg
    43814D0F-4C8D-46CD-995B-EE01B3AB66AD.jpeg
    190.1 KB · Views: 384

Wayne

Administrator
Staff member
Joined
Nov 29, 2017
Messages
7,805
Solutions
2
Reaction score
4,490
Location
Novato, CA USA
These little gems have been dropped off at Aloft and Mo did a great job fitting them out. I can't wait to put them into the air. I may have to give them a test glide at my local field as I'm not sure I can wait until Sunset. :) They are out in the other room, and every time I walk past I have to pick up the plane. Just something about these planes that makes me want to run out to a slope and fly 'em. Maybe I have been away from balsa for too long.
 

Konrad

Very Strong User
Joined
Jan 23, 2018
Messages
7,822
Reaction score
1,488
Location
San Francisco
I saw these in person, very nice work there Motowncali.

I was amused that it looked like the only things these two kits have in common is the fuselage. I actually like this, as it is an indication that the designer has flown both models and has adjusted the tail area to meet the specific need of each model.

Generally most designers would have used the same tail feathers across both designs, thinking that the flight demands aren't different enough to warrant different tails. My hat is off to the designer and manufacture for allowing for different sized tails.
 
Last edited:

Wayne

Administrator
Staff member
Joined
Nov 29, 2017
Messages
7,805
Solutions
2
Reaction score
4,490
Location
Novato, CA USA
Set these little guys up with my radio last night. One of the elevator servos does not seem to happy, so will replace it tonight. Otherwise all programmed up and ready to go. I ended up with the batteries in both planes back by the wing to meet CG. I have a 2S 600 Lipo in the Sailing, and currently have a 700 Nimh pack in the DS-X as I wanted a little more weight in that plane. The Sailing is very light, and the DS-X is slightly heavier. They should fly differently enough thanks to the differences in the planes and the weights. Just need to secure the batteries and they are good to go. :)
 

Wayne

Administrator
Staff member
Joined
Nov 29, 2017
Messages
7,805
Solutions
2
Reaction score
4,490
Location
Novato, CA USA
OH - Yeah, according to the instructions, the Sailing has a more rearward CG by 5mm. That is odd since the DS-X has more rear sweep to the wing! I have the CG on the wing joiner for the maiden and will adjust as needed. Do wonder how you would balance this plane if built as an electric. Would need some tail weight.
 

Motowncali

Active User
Joined
May 9, 2018
Messages
186
Reaction score
43
Location
Napa
I noticed that as well and noted it in the build thread.
Completely agree that the recommended CG on the Sera looks a bit forward, but then again, my Rodent flies better with a forward CG, it does not like to be aft at all.
600mAh, you can fly all weekend with that... I had a little 250 in it. Noticed a servo was noisey, but it centered and moved correctly, so I didn’t worry about it.
 
Top